![DSI-small-square.png]](https://know.dsi-mfg.com/hs-fs/hubfs/Logos/DSI%20Logos/DSI-small-square.png?height=50&name=DSI-small-square.png)
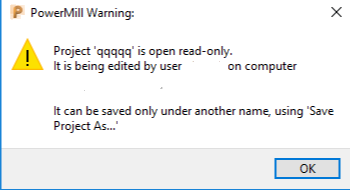
When you receive the warning message, you can use the type in command Project Claim which will allow you to save the current project rather than saving it as another name. This is easily added as a Command button to a custom Taskbar, Custom Ribbon or to run as a macro from your RMB user_menu.
-
On the Home Ribbon, click on the Echo Commands window. Type Project Claim into the command prompt, then press Enter on the keyboard.


-
Create a button on your Quick Access Toolbar.
-
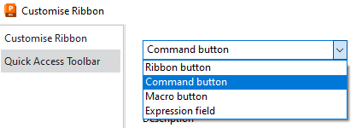
Right-click on the empty area that follows your ribbon toolbars and select "Customize Quick Access Toolbar." This will initiate you to create a new button on your Quick Access Toolbar.
- Select the Command button option from the drop-down menu.
-
Name the button, and add a description that functions as your tooltip fly-out.
-
Enter the command Project Claim; assign a picture to represent the command.
-
Select OK at the bottom of the Customize Ribbon Dialog box when you are done.
When you correctly create the button, you will see a new button on the top left corner of your PowerMill interface.

-
-
Create a button for a custom ribbon toolbar.
-
Right-click on the empty area that follows your ribbon toolbars and select "Customize the Ribbon."
-
Create a new Ribbon Toolbar or update an existing custom toolbar.
-
Select New Tab (or select an existing tab).
-
Create a New Group (or update an existing group).
-
From the drop-down menu, select "Command button," name the button that will appear under the picture, and add a description that will function as your tooltip fly-out.
-
Enter the command Project Claim.
-
Assign a picture to represent the command.
-
Select the "Add>>" button to add the new command button to your custom ribbon.
-
Select OK at the bottom of the Customize Ribbon dialog window when finished.

-
-
Add a command to your user_menu. To add a command to your user_menu, you will need to know some basic knowledge of macro editing.
-
Example code: <button label="Delete lock file" command="Project claim"/>
-