How to use smart selection to pick surfaces for component thickness in PowerMill
Quickly pick surfaces inside component thickness using the surface color, level, and set or the entire model.
Issue
When adding groups of surfaces to a new set for a different machining mode or thickness value, you can quickly define all surfaces using the smart selection tool in component thickness and default thickness.
Answer
Note - The surfaces that you wish to add must already be defined by a similar color, level, set, or model.
Open the component thickness dialog
-
Open the toolpath settings
-
Click on the Component thickness icon

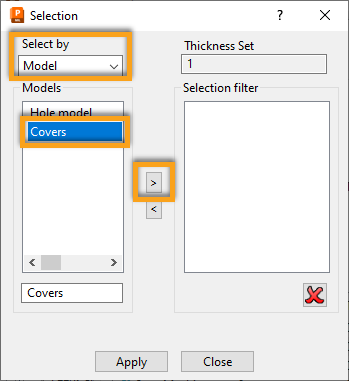
Pick by Model
-
Click on a new set to add the new surface group too

-
Click on smart selection

-
Change the Select by to Model
-
Select the model listed in the Model section of the smart selection window
-
Click on the arrow to move it to the right

-
Click Apply and then Close
The model is now added to the selected set. Machining mode and, or thickness can be set for this new set.
Pick by Color
-
Click on a new set to add the new surface group too

-
Click on smart selection

-
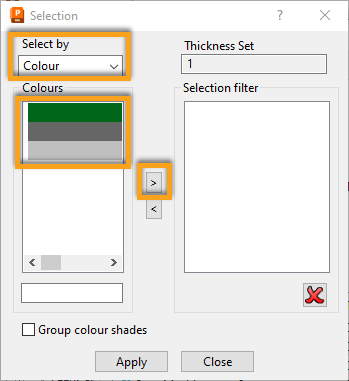
Change the Select by to Color
-
Select the color listed in the Colors section of the smart selection window
-
Click on the arrow to move it to the right

-
Click Apply and then Close
The model is now added to the selected set. Machining mode and, or thickness can be set for this new set.
Pick by Level or Set
-
Click on a new set to add the new surface group too

-
Click on smart selection

-
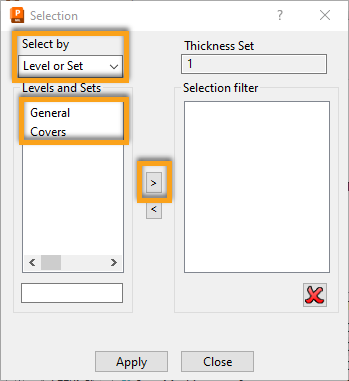
Change the Select by to Level or Set
-
Select the level or set listed in the Levels and Sets section of the smart selection window
-
Click on the arrow to move it to the right

-
Click Apply and then Close
The model is now added to the selected set. Machining mode and, or thickness can be set for this new set.
If you would like more information on Component Thickness options, please check the articles listed below.
How to avoid a surface using component thickness in PowerMill
How to add thickness to a surface using component thickness in PowerMill
How to ignore a surface using component thickness in PowerMill
![DSI-small-square.png]](https://know.dsi-mfg.com/hs-fs/hubfs/Logos/DSI%20Logos/DSI-small-square.png?height=50&name=DSI-small-square.png)